
Monochrome Magic at Hunstanton Beach: Crafting a
Dramatic B&W Seascape
There’s a special kind of allure to a black-and-white seascape. Recently, I found myself on Hunstanton Beach in Norfolk, UK, compelled by a scene that practically begged to be immortalized in monochrome. In this article, I’ll walk you through my process—from crouching in the sand with my Canon 6D to the detailed post-processing in Luminar Neo—sharing both the technical steps and the personal moments behind creating a dramatic black-and-white image. Grab a cup of tea (or your favorite editing snack) and join me on this journey of turning a raw coastal moment into a timeless piece of art.
Location and Atmosphere: Setting the Scene at Hunstanton Beach
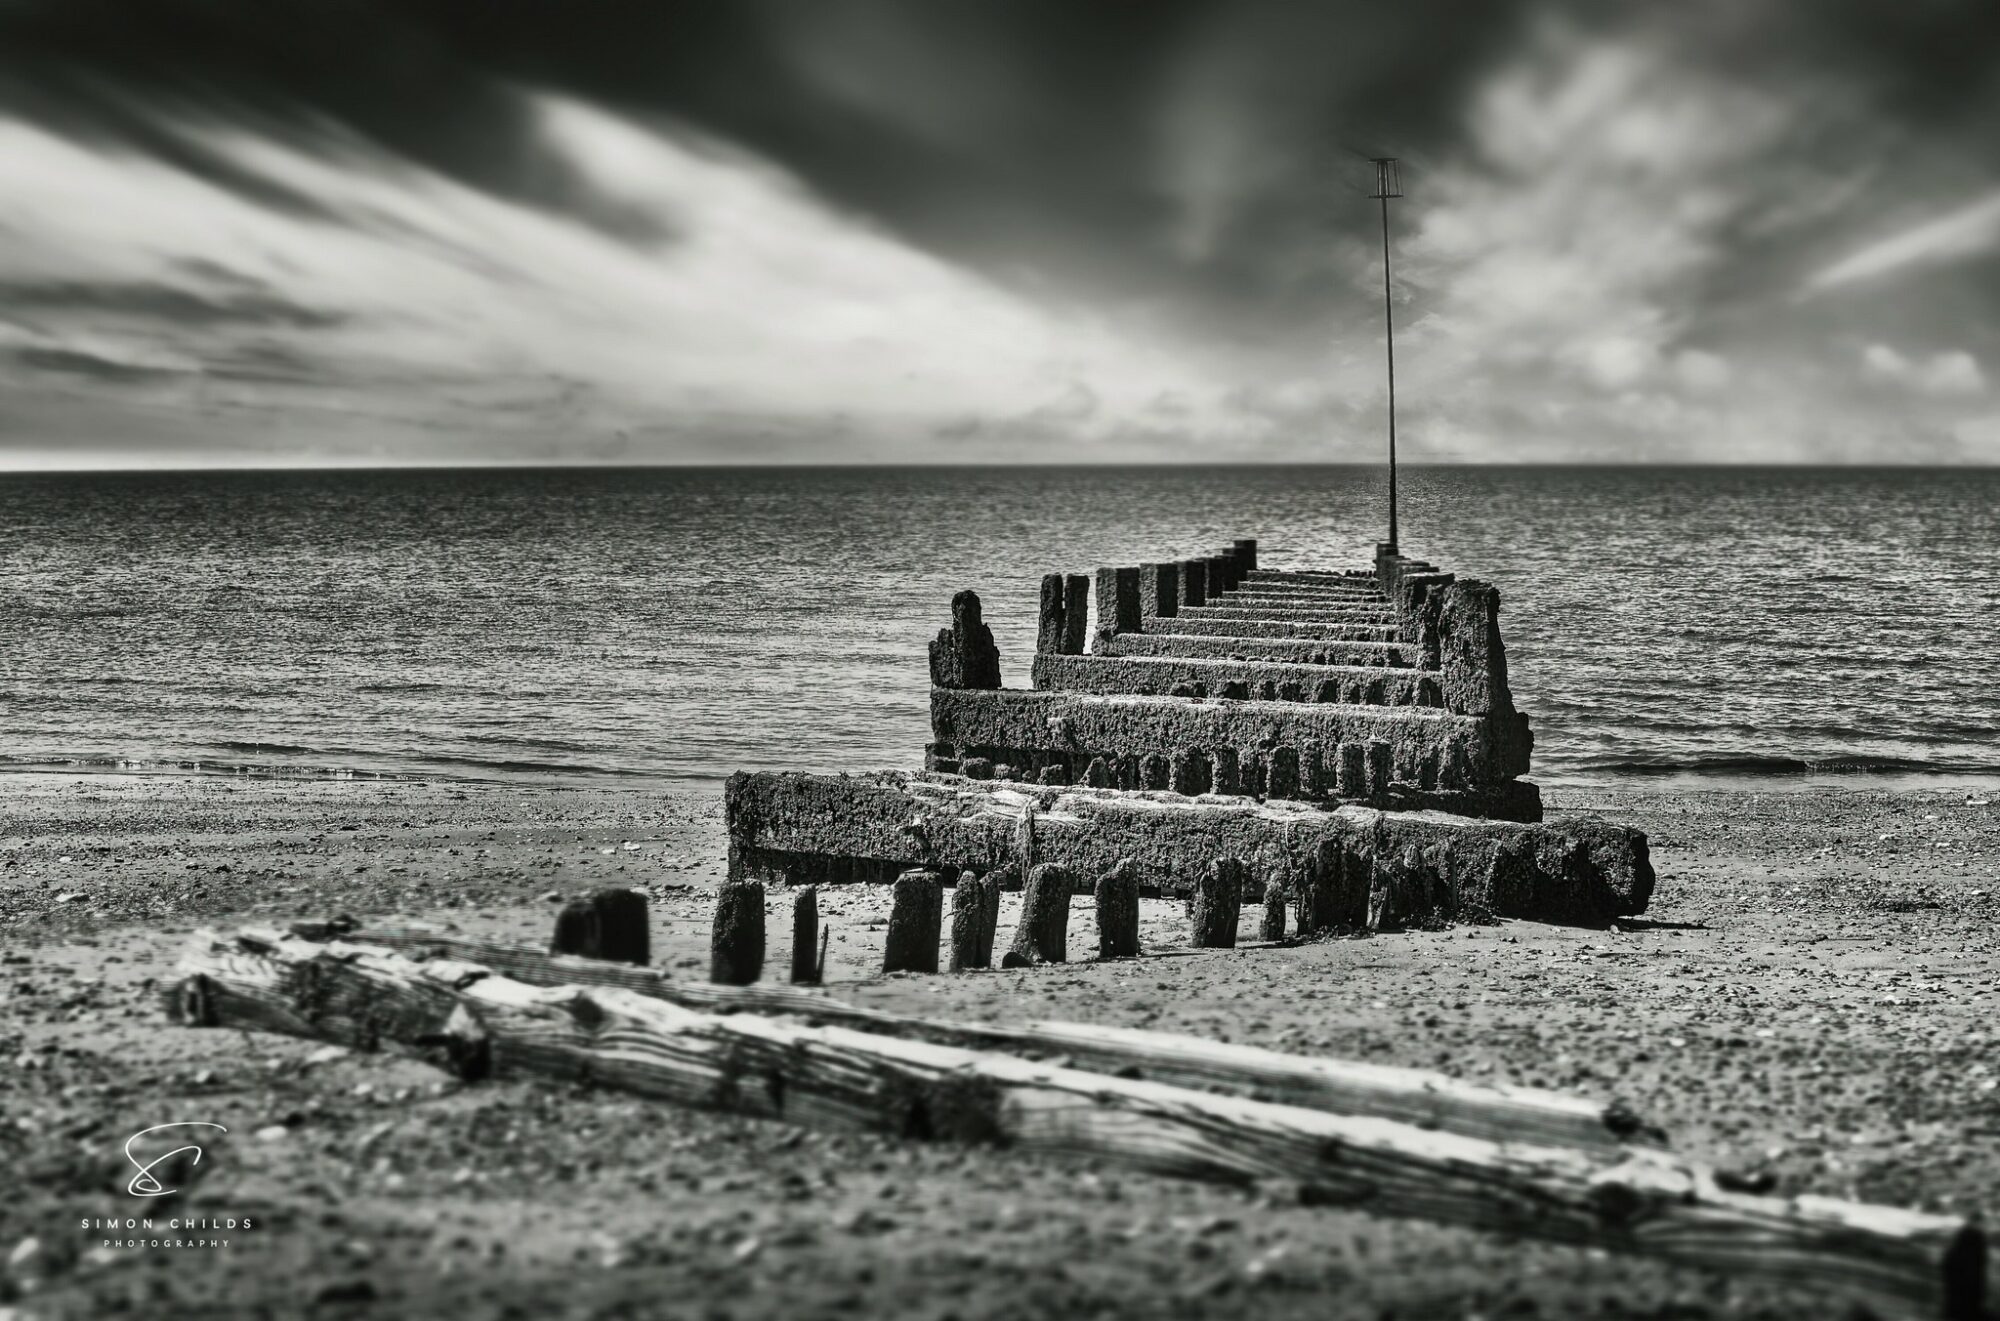
Hunstanton Beach greeted me with dramatic skies and a wild sea. This West Norfolk shoreline is unique—facing west despite being on England’s east coast, it offers the rare treat of sunsets over the water. On this particular evening, the tide was coming in strong, churning up frothy waves that crashed against the old wooden groynes (those low wooden breakwater fences) along the beach. Above, the sky was a patchwork of moody clouds, with the sun occasionally piercing through to send golden rays onto the water. The atmosphere had that perfect mix of beauty and chaos that landscape photographers dream of. I remember thinking “This scene has all the right ingredients for a killer black-and-white image—bold textures, striking light, and tons of mood.” Without the distraction of colour, I knew those elements would take center stage. Hunstanton Beach just before sunset, with waves crashing against a groyne and dramatic clouds as the tide rushes in. The dynamic light and textures here are what inspired the black-and-white treatment.
I wandered along the seawall and shingle, finding the ideal spot where a pool of water in the sand mirrored the brooding sky above. The wind was whipping in off the North Sea, carrying the briny smell of salt and a few sprinkles of mist from the crashing surf. Despite the chill and the fact that I was risking muddy knees and a salt-sprayed face, I couldn’t resist getting into position for the shot. Hunstanton’s atmosphere was simply that compelling—every gust of wind and every wave seemed to dare me to capture the scene in all its raw glory. The dramatic conditions were not just a challenge but also my creative fuel. I was already visualizing the final image: high contrast, deep blacks in the storm clouds, and bright whites in the sea foam, with every texture telling a story. This beach has a way of grabbing your attention, and in that moment, it had every bit of mine.
Camera Setup: Low and Steady with a Canon 6D
To do justice to the scene, I decided to shoot low to the ground. And by low, I mean practically belly-down on the wet sand. My trusty Canon 6D was in hand (no tripod this time—I was traveling light and embracing spontaneity). Getting the camera down near sand level instantly made the foreground feel more expansive. Pebbles and ripples in the sand became prominent leading lines, guiding the eye toward the crashing waves and fiery sky beyond. This perspective gave the photo a strong sense of depth and drama, but it definitely gave my thighs a workout as I crouched and steadied myself!
Shooting handheld at a low angle in fading light was a bit of a balancing act. To keep things sharp, I used a relatively fast shutter speed (around 1/500s) to freeze the motion of the splashing waves. That meant nudging up the ISO on the 6D to about 800. Thankfully, the 6D’s full-frame sensor handles low-light noise like a champ, so I knew I could afford that increase without ruining the image. I also opened up the aperture to about f/8, which on a wide-angle lens gave me enough depth of field to have both the foreground and distant horizon in focus. Pressing the camera down firmly, I clicked a series of shots, praying my contorted yoga pose would yield a tack-sharp image.
Humor aside, shooting low and handheld felt liberating. Without a tripod, I could quickly adjust my composition as the waves evolved—one moment framing a symmetrical reflection in a tide pool, the next moment shifting to include that perfect wave crash as it hit the groyne. The Canon 6D, though not the newest camera on the block, performed flawlessly. Its simple controls meant I could dial in exposure compensation on the fly as the sun beams came and went behind clouds. And while the 6D’s screen isn’t articulated (oh, the joy of basically guessing my framing when the camera is at sand-level), a bit of practice and instinct went a long way. In the end, I captured a RAW image that looked okay in colour—muted blues and browns under a grey sky—but I knew the real magic would emerge in black and white.
Editing in Luminar Neo: From RAW Colour to Striking Black & White
Back at my digital darkroom (a.k.a. my laptop), I fired up Luminar Neo to transform the image from a flat RAW capture into the dramatic black-and-white vision I had in my mind. Luminar Neo is a powerful photo editor with a host of AI-driven tools and creative features, perfect for this task. In fact, it even has a dedicated Black & White conversion tool with intuitive controls to fine-tune contrast, which was going to be central to my workflow. What follows is a step-by-step breakdown of how I edited the Hunstanton Beach shot from start to finish:
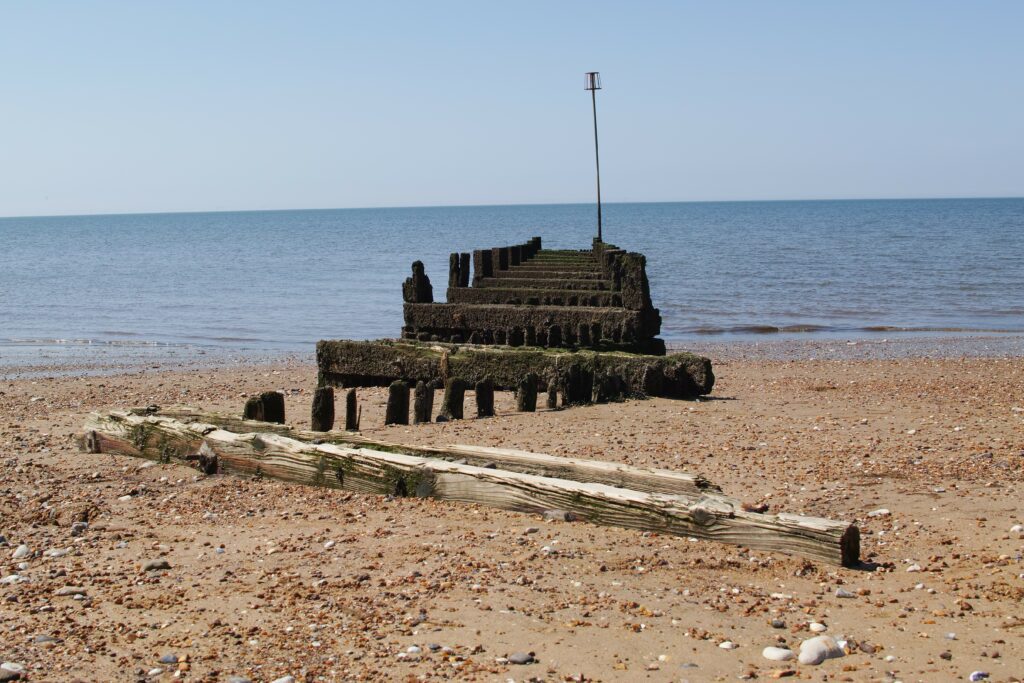
- Starting with a Solid Base – Basic Adjustments: I began by loading the RAW file into Luminar Neo’s Edit module. The first order of business was to get the exposure and tone balanced. Using the Develop (RAW) tools (found in Luminar’s Essentials toolkit), I tweaked the exposure, highlights, and shadows. The sky was a tad bright where the sun poked through, so I pulled down the Highlights slider to recover detail in those clouds. Simultaneously, I lifted the Shadows slightly to bring out some detail in the foreground sand and waves without making it look flat. A quick check on the horizon revealed it wasn’t perfectly straight (surprise, surprise — low shooting angles can do that). Luminar Neo’s Composition AI feature came to the rescue here. I opened the cropping tool, hit the Composition AI button, and the software automatically suggested an improved crop and straightened horizon based on the rule of thirds. I accepted its suggestion, which placed the horizon along the upper third and made sure that interesting splash of the wave was off-center for a more compelling composition. With the scene now level and the basic tonal range set, I had a solid foundation. The image still looked flat and very much “meh” in colour, but that was about to change.
- Sky Enhancement – Swapping in Drama: The clouds at Hunstanton were good, but I wanted great. The scene called for a sky that matched the epic mood in my head. Enter Luminar Neo’s Sky AI tool. This magical feature can automatically detect the sky in your photo and replace it seamlessly with a new one in just a few clicks. I browsed through my sky presets and found an image of turbulent clouds that had a perfect gap for the sun to shine through—very similar to what I saw on location, but a notch more dramatic. With a single click, Sky AI analyzed my photo, masked out the original overcast sky, and dropped in the new dramatic clouds precisely where they should be. Impressively, it even considered the choppy water below, adjusting tones near the horizon so the replacement looked natural (Luminar’s Sky AI even accounts for things like water reflections when blending the new sky. In seconds, the photo had a sky that went from “pretty nice” to “absolutely epic.” Now, you might be wondering: is sky replacement cheating? In my view, it’s just another creative tool. The replacement sky I chose was in the spirit of what I witnessed, only enhanced to amplify the mood. And since my final vision was a monochrome image, I wasn’t concerned about the colour of the new sky—just the texture and contrast it added. (If your original sky is decent and you merely want to boost it, Luminar Neo also offers a Sky Enhancer AI slider as part of its Enhance AI tool, which intelligently boosts clarity and colour in the existing sky. But in this case, I went the full monty with a replacement for maximum impact.)
“Textures become the narrative when colour is absent”
- Bringing Out Details with Structure AI: With the dramatic sky in place, the next step was to accentuate the rich details in the image. Black-and-white photography is often an art of texture, and I wanted those roiling clouds and restless waves to have texture you could almost feel. For this, I turned to Luminar Neo’s Structure AI tool. Structure AI is an intelligent clarity enhancer that increases detail and contrast in an image in a content-aware way. In other words, it knows what to sharpen and what to leave alone (so it won’t bizarrely over-crisp things like smooth water or clear sky areas). I pushed the Amount slider of Structure AI to around 30—just enough to start seeing the clouds gain definition and the foam on the waves stand out. Instantly, the image took on a crisper look, as if someone had etched fine lines along the edges of every cloud puff and swirling wave. I was careful not to overdo it; a little Structure goes a long way. The great thing is that Structure AI is human-aware and content-aware, so if there had been any people or faces in my shot (there weren’t, aside from a distant gull or two), it would avoid making them look grungy. For good measure, I also checked the Details panel (another tool for sharpening small/medium/large details) and gave a minor bump to the small details slider to sharpen the tiniest textures like the pebbles in the foreground sand. These detail enhancements are key to monochrome images—textures become the narrative when colour is absent. After this step, even in colour, the photo was popping with definition. Every ripple in the water and every notch of the weathered groyne was pronounced. It was time to leap into black and white and see all this come together.
- Converting to Black & White: Now for the moment of truth—making the image black and white. Luminar Neo makes this incredibly easy. I scrolled back up to the Essentials tools and selected the Black & White tool. With a quick click on the “Convert to B&W” button, the image instantly transformed from a muted medley of colours into a striking grayscale scene. The effect was immediate: the distractions of colour fell away, and what remained were the contrasts in tone, the shapes, and the texture—yes! This is what I had envisioned. But we’re not done yet. Simply removing colour is just the start; fine-tuning the monochrome look is where the real artistry comes in. Luminar Neo’s B&W tool provides Luminance sliders for each colour channel (reds, yellows, greens, etc.) which let you control how those original colours are rendered in grayscale. This is like the digital equivalent of using coloured filters in front of your lens in the old days. I wanted the sky to be brooding and dark to contrast against the bright foam of the waves. In the original scene, the sky was mostly blue/grey, so I pulled the Blue luminance slider down a bit. As expected, the clouds deepened in tone, becoming more ominous. In fact, often the blue slider is the “secret sauce” for landscape black-and-white — it can darken a sky dramatically, making white clouds pop for that Ansel Adams effect. I also experimented with the Yellow and Red sliders (which would affect how the sunlight and warmer tones in the image translate). The sunbeam piercing through the clouds got a touch brighter when I nudged up the yellow luminance, which was great to draw attention to that spotlight on the water. The changes from these sliders were subtle but important: they allowed me to balance the tones so that the key elements (bright surf, dark sky, textured sand) each had the right level of contrast against each other. This step really personalizes the black-and-white conversion. It’s not just a generic desaturation; it’s sculpting the tonal relationships to guide the viewer’s eye exactly where you want it.
- Mastering Contrast and Mood: With the image now fully black and white and the major elements in place, I moved on to refining the contrast and overall mood. I’m a bit of a contrast junkie — for a scene like this, I crave deep blacks and shining highlights, as long as the details in those areas are still discernible. Luminar Neo offers a fantastic tool called Supercontrast, which lets you adjust contrast in the highlights, midtones, and shadows separately. It’s like having three targeted contrast dials to play with. I opened the Supercontrast tool (found under Luminar’s Professional section) and started gently adjusting each of the three sliders. First, I increased the Shadow Contrast to deepen the stormy cloud bottoms and the darkest parts of the waves. Next, a slight boost in Highlight Contrast gave more definition to the sunray and the foam where sunlight was hitting — essentially preventing those bright areas from looking washed out. Finally, a tweak to the Midtones Contrast added a nice punch to the mid-range grays (think of the midtones as the substance of the photo — in this case, things like the mid-gray sand and water). These selective contrast adjustments made the image come alive: the drama was intensified without losing nuance. Another go-to tool I love is the classic Curves adjustment, which I used here to fine-tune contrast manually by shaping the tone curve into a gentle S-shape (lifting the highlights, deepening the shadows). It’s akin to what you’d do in Photoshop or Lightroom, and Luminar Neo’s curves worked just as expected. A quick comparison with the before/after slider in Luminar Neo at this stage was jaw-dropping — the shot had transformed from a flat RAW to a moody masterpiece with rich, balanced contrast.
“Luminar Neo became my brush and canvas, helping transform a flat RAW capture into expressive art.”
- Finishing Touches – Vignette and Final Polish: With the heavy lifting done, I applied a few finishing touches to give the image that completed look. First, I added a subtle vignette using Luminar’s Vignette tool. A vignette darkens the edges of the frame, and here it helped draw focus toward the center where the action was (those crashing waves and that ray of light). I kept it subtle – just enough that you’d miss it if you weren’t looking for it, but you’d feel it if it were gone. I also made use of Luminar’s Dodge & Burn tool on a new adjustment layer to selectively brighten a few highlights and deepen a couple of shadows. For example, I lightly dodged (brightened) the crest of the waves to make the white foam a tad more brilliant against the dark water, and burned (darkened) a hint around the corners of the clouds to amplify that natural vignette effect of the stormy sky. These small adjustments can have a big impact on guiding the viewer’s eye. Finally, I checked for any noise (the 6D at ISO 800 was fine, but a little luminance noise reduction never hurts in the darker sky areas) and added a touch of sharpening globally to ensure the image would look crisp when viewed large. Luminar Neo’s non-destructive workflow allowed me to go back and forth in the History if I needed, but I was happy with where it landed. Satisfied with the result, I did one last sweep using the before/after view – the transformation was everything I hoped for. The image now had soul: you could almost feel the gust of sea breeze and hear the crash of the waves just by looking at it.
Conclusion: Embracing Monochrome Artistry
Standing back and looking at the final black-and-white image of Hunstanton Beach, I felt a surge of that creative satisfaction that keeps photographers hooked. The photograph had all the timeless drama I envisioned: the sky brooded with intense contrast, the sea churned in textured swirls of gray, and the beams of sunlight broke through like a spotlight on nature’s theater. By removing colour, I was able to highlight the essence of that evening – the interplay of light and shadow and the raw textures of the environment – which is exactly why I love monochrome photography. Every editing move, from the moment I brought down the highlights to the final dodge & burn, was aimed at telling the story I felt while on that beach.
Creating this image was as much about the journey as the result. I still chuckle at the memory of myself lying low in the sand, chasing that perfect angle, and later the thrill of seeing the scene come alive in Luminar Neo with each adjustment. The process combined technical know-how with artistic interpretation – a blend of science and art that is at the heart of photography. Tools like Luminar Neo make the technical part easier than ever (one-click sky replacement and AI structure enhancement still feel like magic), freeing you to focus on your creative vision.
If there’s one takeaway I’d love to impart, it’s this: don’t be afraid to experiment and turn your images into the art you envision. Whether it’s converting a photo to black and white to capture a mood or using innovative editing techniques to overcome shooting limitations, let your creativity run wild. Hunstanton Beach taught me that even a familiar location can yield something extraordinary when you see it in a different light (or lack of light, in the case of black-and-white!). So next time you’re out with your camera and you encounter a scene with great contrast, textures, or mood, consider giving monochrome a try. And when you do, tools like Luminar Neo’s Black & White converter and AI enhancements are there to help translate that vision into a stunning image.
In the end, photography is about storytelling, and a well-crafted black-and-white image tells a story in a language that’s universal and timeless. My adventure at Hunstanton Beach is now encapsulated in shades of gray, and to me, that grayscale speaks volumes. I hope this journey through my process has given you some ideas and inspiration for your own work. Now it’s your turn – go out, shoot, edit, and create your own monochrome magic.
Happy shooting!
Simon Childs
Luminosity League Founder